Wednesday, April 29, 2015

Curriculum Mapping ~ ELA Style

Teaching with a Mountain View posted a really interesting question on her Facebook page the other day about creating a scope and sequence (April 20th if you want to go look for it! :)

One of my favorite things to do is to play with curriculum, so I was watching it to see what others had said. In fact, if I could go back and redo my Master's, I would choose Curriculum! As it is, I'm looking for a CAGS or half-master's program in it-haven't found one yet, but I'm looking!

Then I got to thinking (always dangerous! ;)-why don't I share how I map it out?

This is what works for me-something different may work for you. And if so, can I direct you to Teaching Maddeness (who is currently running a planning series!), Ashleigh's Education Journey, What I Have Learned, and Scholastic?

First, pick one topic to concentrate on. Don't try to do the whole year for every subject at the same time. Small steps. Small.

Then, gather all the materials you need. I'm going to show you how I did my ELA map (which I started last summer-so I did have some 'pre-planning' done). This summer I'm going to focus more on math,

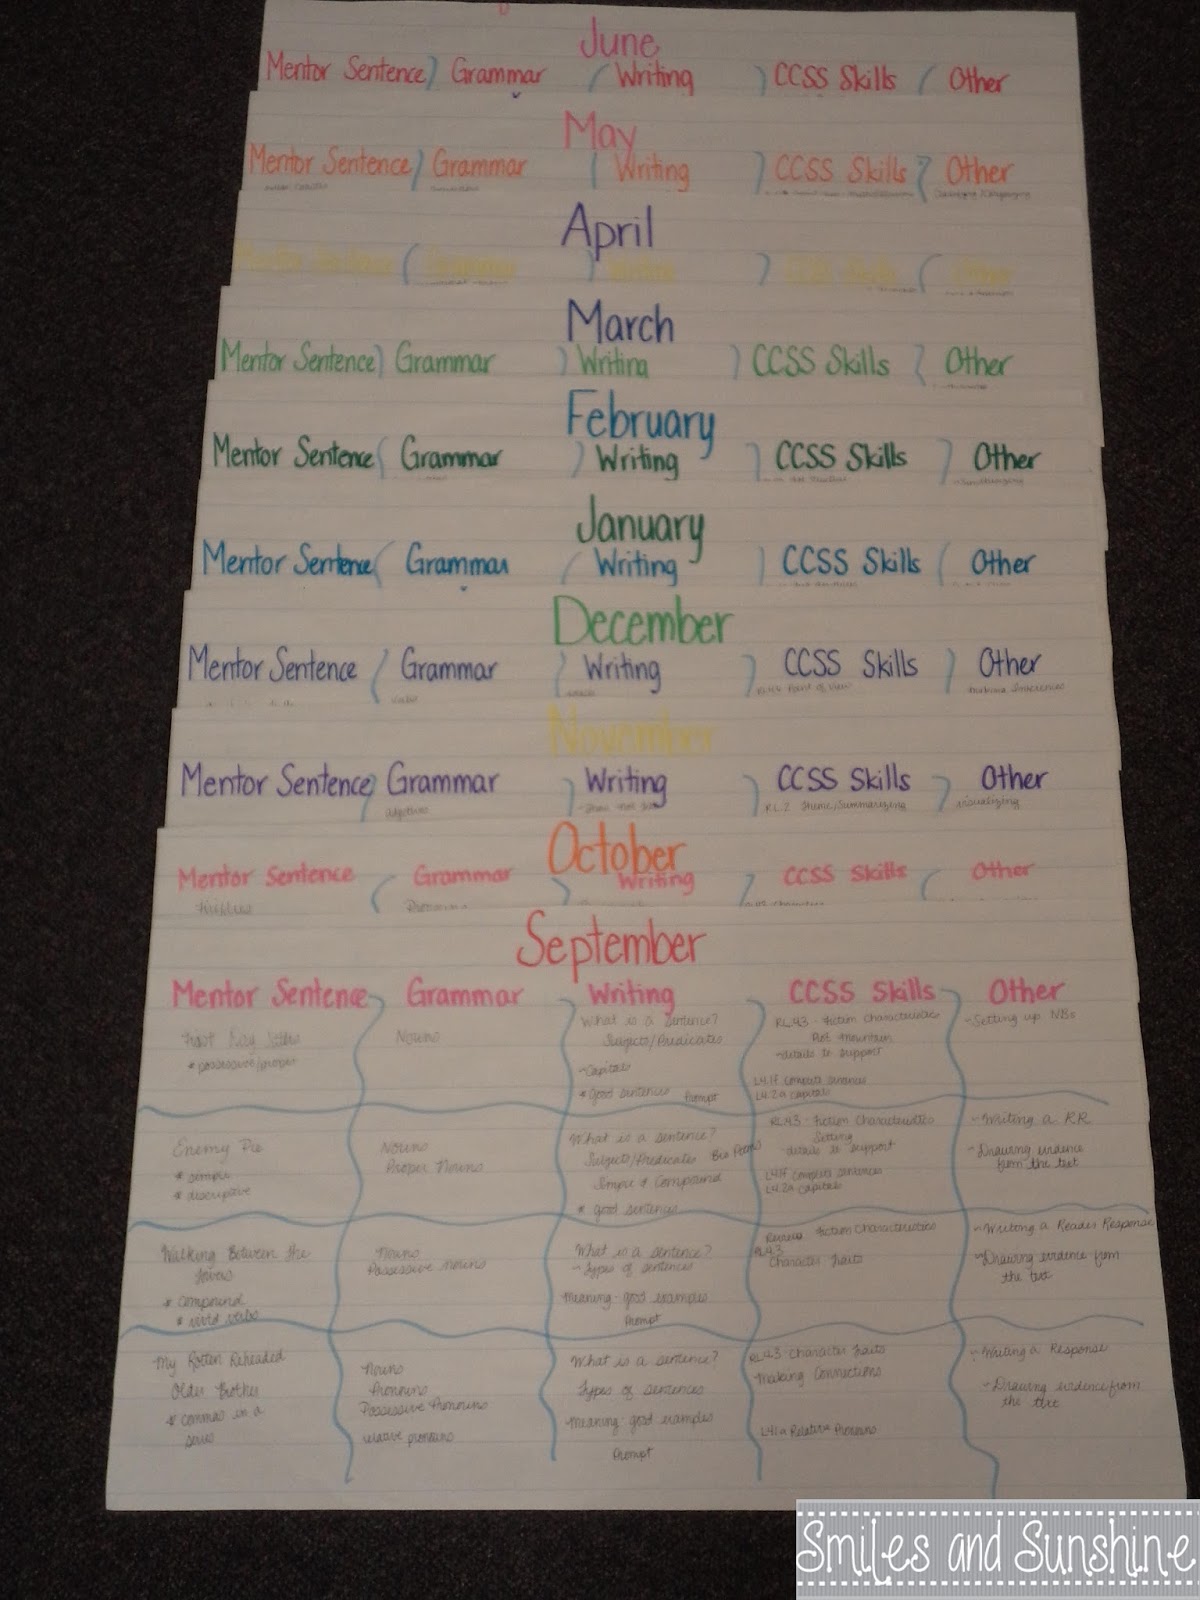
Lay out your months, then divide them into weeks. For this, I used to bottom half of my morning message chart paper-it gave me more room to work.
 Divide each month into weeks (or unit into days)
 And by how many subject areas you want to cover.

Some suggestions for things you need:


Since I did all of ELA, I divided my paper into sections-for each of the sections I will teach
Then, I started plotting out my year.

I first started with my Mentor Sentences. This gives me a mentor text, plus focuses on grammar skills.


 Then, I moved onto grammar.

Last year, I reorganized the sequence for our series-putting the parts of speech into what I thought was a logical order, instead of skipping all around. I allotted about a month for each part of speech-knowing I wouldn't be able to cover it everyday, but it gave me a guide of how long it took.

After grammar, I hit up writing.

Using what I have learned (here, and here), plus some advice from a colleague (who's an excellent writing teacher) who recommended some books, I started to plan it out.

I'm definitely heavier on the description in the beginning of the year vs. the end of the year-there are more 'smaller projects' we need to do before we can do longer pieces. Plus, I want to make sure that they have the basics and are clear on the expectations before I move forward.


Then I moved onto the biggies-the CCSS I'll be covering, as well the other skills that come along with reading.

This is where my previous experience came into the most play.

I took what I did this year, and moved things around a little, using the experience, plotted out (to me) a logical sequence that builds upon one another.


This is also where I pulled in my basal.

*Tangent* Unless you are absolutely required to teach lesson A on day 1 and lesson B on day 2, I would highly recommend  using your basal as a resource. You don't have to do everything they have in there! Pull out the best parts-and supplement the rest! You know your kids-and what works best.

I pulled out the comprehension focus for each of the units, as well as one or two stories that 'fit' with the focus. Some of these comprehension skills are 'implied' in the common core, and they are still important to teach.

Then, I went back, and using a checklist of the CCSS, I checked off what I had already written down. (I did this on my iPad using an Evernote checklist during SBA testing-but paper and pencil work too! ;)

When I got towards the end, any standards left over went into the months of April, May and June. This way, I've made sure that I've covered all the standards by the end of the year.

Now, I have a broad overview of things to cover and when, helping to keep me on track when I lesson plan. It also reminds me not to skip anything, and I know that I'll have covered all the skills they need when I'm done. 

My next step is to take my half charts and type them up. I'll print them out and have everything bound at Staples for $5-this way I have a easy, portable map that I can use to help me daily plan.

Isn't it pretty-it doesn't have to be boring!
I hope you found that helpful! It's a step by step process, and working at it little by little, you can get your whole year planned out. My goal this summer is to focus on math, and nail that down better.

Good luck!

Smiles and Sunshine,
Kaitlyn

Monday, April 27, 2015

The One iPad Class ~ Assessment Apps

Today I'm going to focus on the different apps I use to help me assess and gauge student progress.

http://kaitlyn-smiles.blogspot.com/search/label/One%20Ipad%20Class
Evernote helps a lot with this, as I take pictures of work and write observations. That post is here.

I've also found some fun apps that I'm excited to share with you!

Image result for plickers Plickers {FREE} I've talked about Plickers before, but it bears mentioning again.

It's a quick, easy way for me to check understanding, and the kids always love holding up their cards and seeing their name checked off.
I also love how it tells me the percentage of students who go it right-and it's colored coded!
The closer to 100, the greener it is. It does turn to yellow, orange, and I'm assuming red (haven't had that one yet! ;). This lets me know if I need to refocus on a skill.

Image result for seesaw app{FREE} Seesaw is a portfolio systems that can work with one iPad, or a class set of iPads. You can also share with parents!

You start by setting up a class.

You can easily add students, change their icons and delete students.

Once your class is set up-which takes like, two minutes, you're on the manage screen.
This is one of my favorite parts. The students can add their work through the app, but so can you. If you only have 1 iPad like me, you can still use this and share with parents. Plus, you get to 'approve' the things the students submit.

And, they don't have to submit just a picture-there are lots of options!
Students can easily log into their account through a QR code-never forgetting usernames or passwords!

Buzzing with Mrs. McClain has a great post on how she uses Seesaw (and how I found out about it!)

I'm super excited to use this one!

I've mentioned this one in my Standards post, but it also has an assessment component!
https://itunes.apple.com/us/app/trackcc-browse-track-share/id924533158?ls=1&mt=8  {$25 for assessment piece} Track CC not only has your standards, but for a $25 subscription, allows you to track student progress towards those standards.

They have it set up a few ways. You can either:

View by student

Or by standard.

I haven't tried out the assessment feature yet-I'll wait until next year before trying that out and deciding if it is worth the $25.  But I've gotten plenty of use out of the standards and I Can statements! Right now, it's only available on the App Store, but they are making plans for Google Play.

This is great for people who have a standards based report card-with the standards on it.

The last  app I'm going to share with you is not even out yet-but I'm super excited about it!

{??/$$$} Snapfolio is being created by the creators of Confer.

They have this cool video to show what it all about.


What I like about this is that you can track the standards (like above) and attach documentation as well.

I can't wait to see more from this!

Of course, there are other assessment apps (Socrative and Kahoot), but those aren't one iPad apps ;)

Smiles and Sunshine,
Kaitlyn

Wednesday, April 22, 2015

Notebook Evolution ~ Math

Looking back, I'll definitely say my use of math notebooks has improved!

http://kaitlyn-smiles.blogspot.com/search/label/notebook%20evolution

When I started doing notebooks, I definitely knew I wanted to do them, but was a little unclear how to go about it.

Then Common Core and Teachers Pay Teachers came along and it got a little easier! :)

But let's take a walk down memory lane...
As you can see, in year 1, I didn't get very far. I used it mostly for our geometry unit.

But last year and this year...
We're actually further along this year than last-even though it looks the opposite! I've started combining pages on the same skills, and just extending the pages numbers in the table of contents.

Let's go back to year 1 for a minute. This year, I was figuring it out as I went. (I was also doing math workshop this year and teaching three lessons a day in an hour period)

I didn't really get into the groove until geometry, which I did in February. I did this whole class, which lent itself for notebooking better.

I did a lot of what I like to call, 'old school foldables'- you know, with construction paper :)
I also sourced a lot of this through the web, but the way our series taught skills was spiral (not that there is anything wrong with that), and it made for a jumbled up notebook-until I threw the series pacing out the window and used it as a resource!

In year 2, I started off with a left learning page-but as I was trying to pilot a new series, the notebook had been left behind (until the end of the year, when I was frantically trying to teach two subjects at once...)
Different between year 3 and year 2
Yeah, that didn't last long. It took my kids too long to set up, when we had to be movin' and groovin'.

In year 2, I also found a wonderful resource from Mrs. C's Classroom, that was almost the answer to all my prayers. 

It's common core aligned, has practice pages for certain skills (which means they can do them independently!)

I used it almost exclusively for year two.
Year 2-trying like crazy to get it all in
Now on year 3, I use...a mix!

I use some of Mrs. C's Classroom (sometimes more for the practice-it turns into a station), some of my own created-with instructions and practice
Me created-I did a lot for the fraction unit-which I'll revise a little for next year!
and some old school foldables
Some Mrs. C's Classroom and old school foldable being friends :)

I've moved from the notebook being more teacher directed to more student learning, and hope to continue that next year. (Boy, do I have big plans for my math block next year...I hope you'll stick around to see if it works out!)

My goal next year is to have math notebooks as one of the stations-and also start using math prompts more (we did a little of that here and there for fractions, but I want more!)

Hopefully, our math notebooks will be a resource my kids can keep and use for years to come-that's my goal, anyway!

Smiles and Sunshine,
Kaitlyn

Monday, April 20, 2015

The One iPad Class ~ Reading Record Apps

Hi Everyone!

http://kaitlyn-smiles.blogspot.com/search/label/One%20Ipad%20Class
Today I'm going to focus on apps that I use during reading groups, or to help assess reading.

I've already talked about how I use Confer.

But I have some handy dandy other apps that I've found helpful.

Image result for levelbook app {FREE-10 Students/ $9.99-Unlimited Students} Levelbook is an app that allows you to record and store running records or benchmarks.

I currently use the free app (for my students that I keep for guided reading groups).

You can set which reading system you use, DRA, Lexile, Fountas & Pinnell, etc. What I especially like is that you can add books to your 'library'.

For example, my district uses Literacy By Design (which is a whole 'nother post), which as ABC levels like Fountas & Pinnell. (But they will tell you very clearly that it is not Fountas & Pinnell, and we can't use Fountas & Pinnell benchmarks (i.e, at the end of 4th they should be...) even though one of the ladies was on the design committee.)

I was able to input my benchmark books by adding the title, level and number of words they read and off we went!

I love that it allows you to record a student, and mark their errors (which helps calculate WCPM), and set a comprehension score.
It saves it, so you can always go back and listen to your student.

And, if your student isn't meeting the benchmark, or didn't quite pass, they let you know that by turning them yellow (or red...)
This student had great comprehension but A LOT of errors while reading-below the accuracy rate
This just lets me know who to keep an eye on.

Image result for running record calculator {FREE-w/ads/$3.99-w/o}  Running Record Calculator is another app I've found comes in handy.

I use the free version, which recently underwent some updates. Before the update, I had to input the time, words read and errors/self-corrects and it calculated the WCPM.

Now, you can record the student while they are reading and flag the errors (just like in Levelbook, but the calculator doesn't save the recording).
I mainly use it as just a calculator-that's all I need it for.
If you do record it (and remember-it doesn't save the recording!), you can email it to whomever you want-a printout-not the recording.

  {FREE} Record of Reading is an app that allows you to take a running record on your iPad.

You can write right on the app, record the student, and it calculates for you. You can also upload a picture to record on.


It does have a wrist screen shield, so you are not marking willy-nilly.

This can also be saved (DropBox) or emailed.

I'll be honest...I did delete this app. That's not to say it's not a great app, but it is not for me. I don't do constant running records, and when I benchmark, there are other things I need to do with the students. Plus, I don't always benchmark just my students, and while I'm okay with tech, my teaching partners are a little more...wary.  Right now, I prefer paper/pen when benchmarking, and supplementing with the two apps above.

But this is free, so go ahead and give it a try!

Smiles and Sunshine,
Kaitlyn